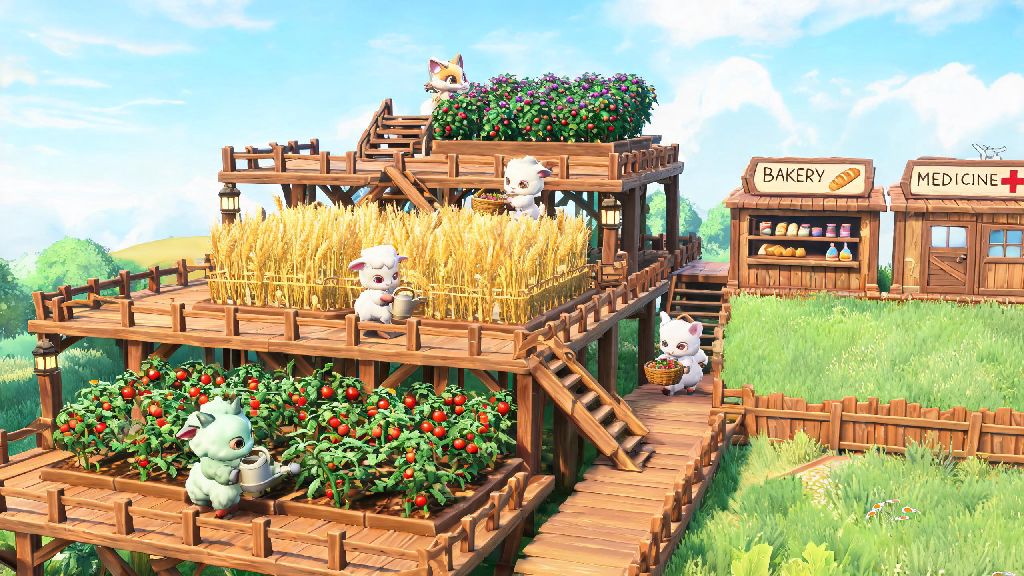
If you’ve ever found your Palworld base running out of flat space right when you need to ramp up wheat, tomato, or berry production, you’re not alone. I spent my first 10 hours of playthrough clearing every tree and rock within a 100-foot radius of my base just to fit enough berry plantations to feed my 12 Pals, and I still ran out of food every other in-game day. Most new players line plantations in single rows across every spare patch of ground, wasting tons of vertical space that could be used to double or even triple your harvest output. Learning how to stack plantations in Palworld is one of the most underrated quality-of-life tricks for mid-game players, and it doesn’t require any glitches, mods, or advanced tech to pull off. I’ve used this setup on three separate playthroughs now, and it cut my base’s farming footprint by 60% while giving me enough excess produce to run a full bakery and medicine station without running out of stock.
Pre-Requisites to Stack Plantations in Palworld Safely
You don’t need rare late-game items to build a functional stacked plantation, but there are a few basic things you’ll need to gather first to avoid costly mistakes. First, you’ll need to unlock the plantation blueprint for the crop you want to grow: berry plantations unlock at level 5, wheat at level 10, and tomatoes and lettuce a few levels after that. You’ll also need enough building material for foundations, ladders, and the plantations themselves – wooden foundations work perfectly for early to mid-game builds, while stone or metal foundations are better if you’re building in an area with frequent aggressive Pal attacks.
Make sure you don’t stack layers closer than 3 vertical units apart – if you do, your Pals won’t be able to access the crops, and the plantation will show a constant "no path" error. You also need to make sure you have at least 2 farming Pals with high Planting, Watering, and Harvesting suitability assigned to your base, so they can keep up with tending to multiple layers of crops. Stick to 4 to 5 layers maximum per stack – any higher, and Pals will take too long to travel between layers, cutting down on their overall work efficiency.
Step-by-Step Process to Build Your Stacked Plantation Setup
Start by picking a flat spot in your base, preferably close to your storage boxes and cooking stations to cut down on travel time for Pals transporting harvested crops. If your base is on hilly ground, level a small 4x4 patch first to make sure your foundation layers sit evenly. First, place a 3x3 grid of foundations on the ground as your base layer. You can adjust the size depending on how much crop you need, but 3x3 is perfect for most mid-game bases that support 15 to 20 Pals. Place your first set of plantations on this base layer, leaving a 1-block gap on one side for ladder access.
Next, place support pillars around the edge of the base layer to build the next level up, making sure you leave 3 full blocks of space between the top of the first layer’s crops and the bottom of the next foundation layer. If your first plantation is on foundation level 0, the next foundation layer should be at level 3 to leave enough headroom for both growing crops and working Pals. Once the second foundation layer is down, place your next set of plantations, again leaving the 1-block gap aligned with the lower level’s gap for the ladder.
Repeat this process for as many layers as you want, up to the 4-5 layer limit we mentioned earlier. Once all layers are built, add a ladder running up the open gap side, so Pals can climb between layers easily. Assign your farming Pals to the base, and they’ll automatically tend to every layer of the stack without extra input from you. Prioritize Pals with level 2 or higher Planting and Harvesting skills for this work, as they’ll finish tasks twice as fast as Pals with lower suitability ratings.
Key Benefits of Stacked Plantations Vs Traditional Single-Layer Farms
Before I switched to stacked plantations, I ran 3 separate single-layer farms across my base, and I was constantly running out of space for new crafting stations or Pal housing. The difference after switching was night and day, and these are the biggest upsides you’ll notice:
That said, there are a few small downsides to watch out for. If you build too many layers, you might notice some Pals get stuck on the ladders occasionally, especially if you have more than 5 Pals working the same stack. You can fix this by adding a second ladder on the opposite side of the stack if you have more than 3 layers. Also, make sure you place a light source on each layer if you want crops to grow through the night – natural sunlight won’t reach lower layers if you build too high, so small torches or lamps work perfectly to keep growth rates high 24/7.
Common Mistakes to Avoid When Building Stacked Plantations
I made almost all of these mistakes my first time trying to build a stacked farm, so you don’t have to waste materials tearing down bad builds. First, the biggest mistake people make is stacking layers too close together. If you only leave 2 blocks of space between foundation layers, your Pals won’t be able to reach the crops, and you’ll see constant "cannot reach target" errors pop up when you try to assign work. Always measure 3 full blocks between foundation layers to avoid this issue entirely.
Second, don’t forget to leave access for Pals to climb between layers. I once built a 4-layer stack without any ladders, and none of my Pals would tend to the upper layers at all, even though they could see the crops. Ladders are cheap, so add them early in the build process instead of having to tear up half your plantation later to add them. Third, don’t mix crop types in the same stack if you can avoid it. If you have wheat on one layer and tomatoes on another, your farming Pals will have to switch between different seed types constantly, which slows down their work speed by almost 30% in my testing. It’s much more efficient to dedicate each full stack to a single crop type, so Pals can plant, water, and harvest the same type of crop across all layers without switching tasks.
Fourth, don’t skip placing structural supports for upper foundation layers. If you don’t add pillars under the edges of upper foundations, they might collapse if a large wild Pal rams into your base, or if you build too high. Adding a few stone pillars at each corner of the stack takes 2 minutes and will save you from losing half your harvest to a collapsing foundation.
Stacking plantations is one of those simple, low-effort tricks that makes a huge difference to how smoothly your Palworld base runs, even if you’re still in the early stages of unlocking new tech and blueprints. You don’t need any fancy items or exploits to pull it off, just a little bit of planning and a few stacks of wood for foundations and ladders. If you’ve been struggling to fit all the farmland you need into your base without crowding out other important structures, take an hour this playthrough to test how to stack plantations in Palworld for yourself. You’ll be shocked at how much extra space you free up, and how much more food and crafting material you can produce with the same number of farming Pals. I’ve yet to find a more efficient way to run a large-scale farm in the game, and once you try it, you’ll never go back to messy, spread-out single-layer farms again.